Set up Whatsapp Cloud API
- rayshana7077
- Feb 10, 2024
- 3 min read
It’s a three-step process to get access to WhatsApp Cloud API:
Create a personal Facebook account.
Create a Meta Developers account.
Create a WhatsApp application in your Meta developer account.
Once you complete these three steps, you will get your WhatsApp Business ID, and Phone
Number ID that you would need to use WhatsApp cloud API.
Note: Once you get access to Whatsapp cloud API, the same number cannot be accessed in the Whatsapp business mobile application
Create or Use Your Own Facebook Account
Before diving into the setup process of WhatsApp Cloud API, it’s essential to address the initial step: creating or using your existing Facebook account. WhatsApp, requires you to have a Facebook account to access its API services.
If you already have one, great—this step becomes a breeze. But if not, we’ll guide you through the process of creating an account. Here’s how to set up your Facebook account:
1.Visit Facebook: Go to the Facebook website.

2. To create a Facebook account, fill in the details on the Facebook sign-up form: first name, last name, mobile number or email address, password, date of birth, and gender.

3. Verification: Facebook will send a verification code to your mobile number or email address. Enter this code in the space provided to verify your account.

4. Profile Setup: Facebook will guide you through setting up your profile, which may include adding a profile picture and cover photo. You can skip this step if you prefer to do it later.
5. Welcome to Facebook: Once you’ve completed these steps, you’ll have a Facebook account. This account is crucial for accessing WhatsApp Cloud API services and integration.
Now you’re ready to proceed with creating a Meta Developer account.
Create or Use Your Meta Developer Account
Just as a Facebook account is a prerequisite, having a Meta developer account is essential for setting up WhatsApp Cloud API.
Here’s how you can create one or use an existing Meta developer account.
1.Start by logging into your Facebook account. Then, proceed to the registration process by visiting (https://developers.facebook.com/async/registration).
Alternatively, you can start by heading to the Meta for Developers website and selecting the Get Started option.

2. Proceed to the next step by clicking Next to agree to the Platform Terms and Developer Policies.

3. For security purposes, you will be sent a verification code to the phone number and email address you provide. This step confirms your access to these contact points, which will be used for essential developer notifications regarding any changes that may impact your app.

4. Select the occupation that best describes your professional role.

With these steps completed, you’ll be well on your way to using the App Dashboard to create your very first Meta app.
Using an Existing Meta Developer Account
If you already have a Meta developer account, simply login to your account on the Meta for Developers website. Having a Meta developer account allows you to access developer tools and resources, including WhatsApp Cloud API.
With both your Facebook and Meta developer accounts in place, you’re now ready to set up WhatsApp Cloud API and integrate it with your applications or services.
Creating a WhatsApp Application in Meta
Creating a WhatsApp application within your Meta developer account is the next step in setting up WhatsApp Cloud API.
Here’s how:
1.Visit the Meta for Developers website and log in to your Meta developer account.
2. Once logged in, locate the section or page related to the “My Apps” tab within your developer account dashboard.

3. Click on Create App to start the application creation process.

4. Select Other as the app type since neither of the other options is applicable to our use case.

5. Select Business as the app type since this will be used in WhatsApp.
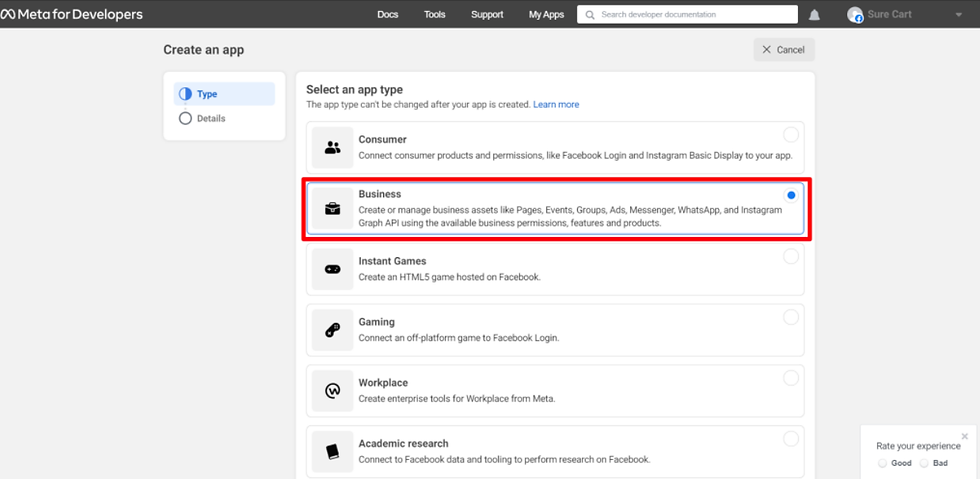
6. Provide a display name for your application and, if applicable, link it to your business account. If you don’t have a business account, don’t worry; the Meta for Developers platform will allow you to create one later on.
7. Click Create App when finished.

8. Scroll down to the WhatsApp section and click Set up.

9. Select an existing Meta Business Account or request the platform to create a new one. Click Continue. Follow these instructions on how to create a Meta Business Account.

With these steps, your WhatsApp application is created and ready to use, complete with a temporary access token.
Note that this token has a limited lifespan, so we’ll show you how to generate a permanent access token for your applications and integrations below.
Take note that the Temporary Access Token, Phone Number ID, and WhatsApp Business Account ID are the important information that you need when using WhatsApp cloud API.

Comments